https://www.youtube.com/watch?v=lD7US8jkD10&t=12s
gina Butler
www.ginabea.blogspot
YouTube: 1630gina
ginabea@gmail.com
These are tips that may help when you are tatting organic Mignonette Bags. The most important thing to remember: You cannot “tat it wrong”. I find that each bag that I tat is different from the last. Through the years I have changed the way I end and add thread from my shuttle. I may not always do a shoelace to switch shuttles because I was finding that it caused the split ring to twist. Sometimes I forget and do get a twisty split ring – oh well! I used to do a mock picot, but now find that it is not necessary. Get it?!? Just let the thread guide you ; D
For more info on this fun technique, seek out the book “Modern Mignonette” by Judi Banashek.
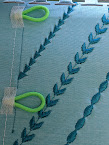
After the center ring of picots, I begin the first few rounds of the mignonette bag with a split ring to climb out from round to round.
This split ring is usually finger tatted. In this picture, I have wrapped the bare thread around a piece of masking tape (sticky side in) to help control it. If your goal is front side tatting throughout your bag, you may find it easier to leave this spit ring thread long enough for the entire bag and wind it on a shuttle. Then you will have the option of easily tatting your double stitches in reverse order as needed.
At this point, you can do a shoelace to switch shuttles (but you may experience the twisty split ring I mentioned earlier).
Or! You can begin your split ring with the bare thread.
Use the shuttle thread for the second portion of the split ring.
Note that I did NOT do a shoelace.
I did NOT do a mock picot (by flipping the first half of the double stitch then NOT flipping the second half).
I merely left a slight space of bare thread before beginning my split ring.
Result? No twisty split ring into the next round.
In this round, I tatted RODS (reverse order double stitch). This allowed me to use the shuttle to tat with instead of the bare thread wrapped around a piece of tape ;P
You can tell I am on the back side of the tatting because the stitch caps of the center ring are not visible.
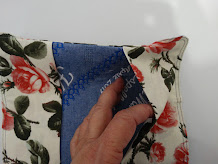
To continue, I will now turn the work to the front side and begin the split ring with the lighter brown thread (shuttle).
As I begin tatting the third round, I want to start planning the elimination of the bare thread that is being used to make the split rings. A split ring does not have to be equal on both sides. You change the exit point of the split ring by tatting more stitches on one side or other of the split.
In the last ring of the third round I tatted over the bare thread tail that was being used for the split ring to go from round to round.
This ring was tatted with extra double stitches to fil
l the space, as well as help the transition into the next round.
Note: Occasionally, when tatting mignonette, I will remember to drop the shuttle down through the ring before closing it. This seems to help fill in the gap at the base of the ring. You can see by these examples, that I did not think of it in time. (If you are on the back side of the tatting you might take the shuttle UP through the ring before closing it.)
Additional Note: On some of my bags I used SSSR (single shuttle split ring) to go from round to round. It is a fun but tricky technique and is covered in my lesson “Heart Strings”. The SSSR technique was developed by Matthew Takeda and is presently shared on Bina Madden’s Paradise Treasures tatting technique page.
Fill a shuttle with thread. Make a slip knot in the end of the new thread. Pull on the thread coming out of the shuttle to snug the slip knot close to the last tatted ring.
When you pull the new thread taut, it will lock itself to the old thread. This is often called a weaver’s knot. It creates almost a splice of the two threads – much cleaner than an overhand knot. If you need to open the weaver’s knot, pull on the ends of the old thread. The new thread will roll back and unlock the knot.
Begin the next ring, tatting over tails. You will tat over both the old and the new threads.
brown thread = old thread
pink thread = new thread
After tatting 3ds, tat the first half of the 4th ds and cut the new thread away. Complete the double stitch by tatting the second half.
You can make the join into the previous round and the old thread will follow.
As before, cut the old thread between the first half and the second half of the double stitch.
So! You have added a full shuttle of thread and TOT (tat over tails) to hide the ends of both the old and the new threads.
Yes, this ring is slightly thicker, because of the thread tails encased in the double stitches.
Flatten the ring with your thumbnail to help it blend in.
From this point, you will merely spiral your double stitches for each subsequent round.
Because you started with whole rounds and you are now blending into a spiral, you may notice a funny “jog” or hollow space in the tatting.
Add a double stitch or two to help the ring fill in this space.
Remember that the rings don’t have to be equal on both sides of the join into the previous round.
Also, you can add more than one ring into the bare thread of the previous round. This will increase the size of the bag as well as fill in any gaps.
Decreasing the size of rounds is done by skipping joins or decreasing number of ds in the rings. You may want to do this as you begin tatting the sides of the bag.


